Objectives & prerequisites
- Explain the purpose of template files.
- Explain the concept of theme inheritance.
- List the steps to take to find the right template file to override.
- Explain what is meant by "overriding a template.
- Name Drupal's default template language.
- Basic understanding of the structure of your Drupal project’s directory
Introduction
Drupal's functionality and output are meant to be extended an or overridden, and there are mechanisms in place to do this in a safe and controlled way.
Just like back-end developers can extend or override Drupal's standard behaviour, front-end developers can use template files, preprocessing functions, and theme hooks to override Drupal's standard output.
Template Files
When Drupal assembles a typical page for output, it uses dozens of theme functions and small Twig template files to render the HTML of the individual parts.
→ Twig refers to the Twig template language - more on that later. Twig files are a mixture of HTML, variables, and some simplified programming language features like conditions and loops.
Each page type, content type, node, region, block type, block, table, list, image, … has its own template file, or shares a template file with similar objects that are all rendered the same way.
From the overall page layout to the rendering of an individual image or bullet list, template files are the key to telling Drupal exactly which HTML markup it has to generate.
Let's look at a simplified diagram of the various template files that are used for the different parts that make up a page. Note that the template files for elements such as the page title, individual fields, and images have been left out of this diagram for clarity.
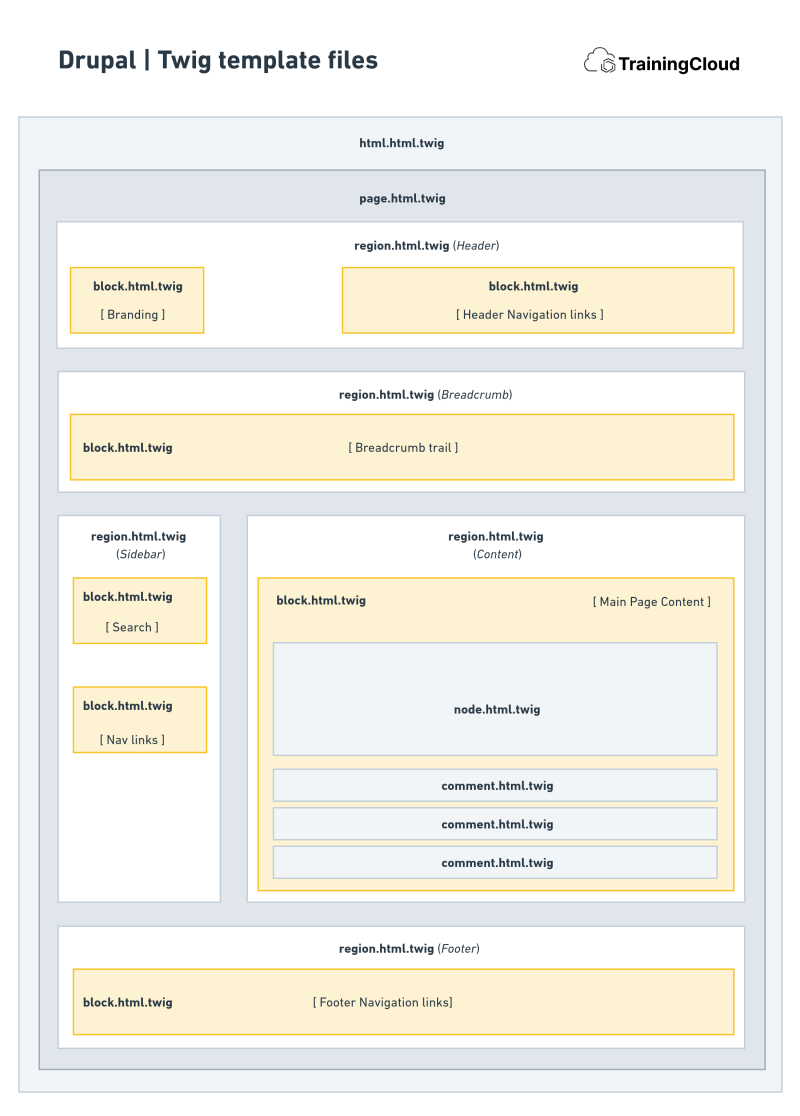
The page rendering mechanism (simplified)
To build the output of each individual page part (a menu, a sidebar, a block, or even an individual field), Drupal goes through the following process:
- gather the data that needs to be shown
- load the correct template file
- combine the data and the template file into a chunk of rendered html
When all the page parts have been rendered individually, Drupal combines them all into a completed HTML page and returns that to the requesting browser.
As a Drupal front-end developer it's up to you to override template files so you can make Drupal generate the HTML markup you want instead of the markup it produces by default.
Overriding a template file
By overriding a template file you instruct Drupal to use your alternative template file instead of the template file Drupal would have used otherwise.
Never modify template files in their original location directly; if you do so you risk making Drupal unstable, and your changes will be lost the next time you update Drupal.
The correct way to override a template file:
- Figure out which template file you need to modify.
- Copy that template file into your theme's
/templates/directory. - Make modifications to the copied file.
- Clear your caches.
How does Drupal select which template file to use?
When Drupal needs to render something, it first checks if there is a suitable template file present in the current theme's directory.
If it doesn't find a suitable template file in the current theme's directory, it checks in the base theme's directory (if your theme inherits from a base theme).
If it still hasn't found a suitable template file, it checks if the base theme itself inherits from a base theme and if so, checks that theme's directory, and so on through the inheritance chain.
Finally, if no other suitable template file is found, Drupal falls back to the default template file originally provided by core or a contributed module.
The following flowchart shows the simplified process of Drupal's decision process to select an appropriate template for rendering an item.
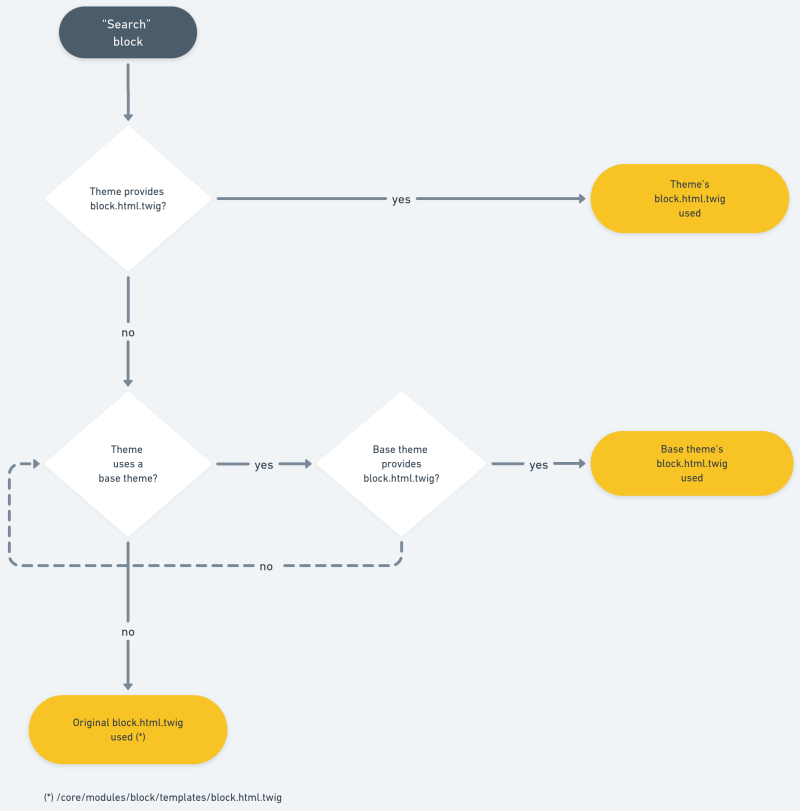
While this flowchart is correct, it is not complete. In reality the template selection process is a bit more complex due to the template suggestions system that lets you provide templates for some blocks, or just one specific block. We will come back to this later.
Activity 1
You want to override the block template to customise the HTML and to also show the block's internal name (block id).
To do so you must figure out which template file is being used, copy that into your own theme directory, and modify the file.
Where do you start looking and which file are you looking for?
Activity 1B
If you looked carefully you found out that Stable9 does indeed provide a block.html.twig template at /core/themes/stable9/templates/block/block.html.twig.
Copy (don't move!) Stable9's into your theme's /templates/ directory. You can create a blocks subdirectory inside your templates directory and place the block template in there, or place it directly in the templates directory - how you organise your template files is up to you.
Inspect the copied file. The first 30 or so lines of the template file are useful comments about what the template file is intended for and which variables are available for output.
Look through the block of comments and go over the variables, in particular the plugin_id variable.
The next 10 lines are the actual Twig template: HTML mixed with a bit of Twig syntax such as:
Printing variables: {{ content }}
Conditional logic:
{% if label %}
<H2>{{ label }}</H2>
{% endif %}
→ conditionally prints an <H2> element if the label variable has a value.
You'll learn more Twig syntax later on.
For now, modify your copied template file: on the line before the one that contains <div {{attributes}}>, add the following:
<div>
 Block ID: {{ plugin_id }}
</div>- Save your template file.
- Clear your caches.
- Reload your homepage.
It should look similar to this:
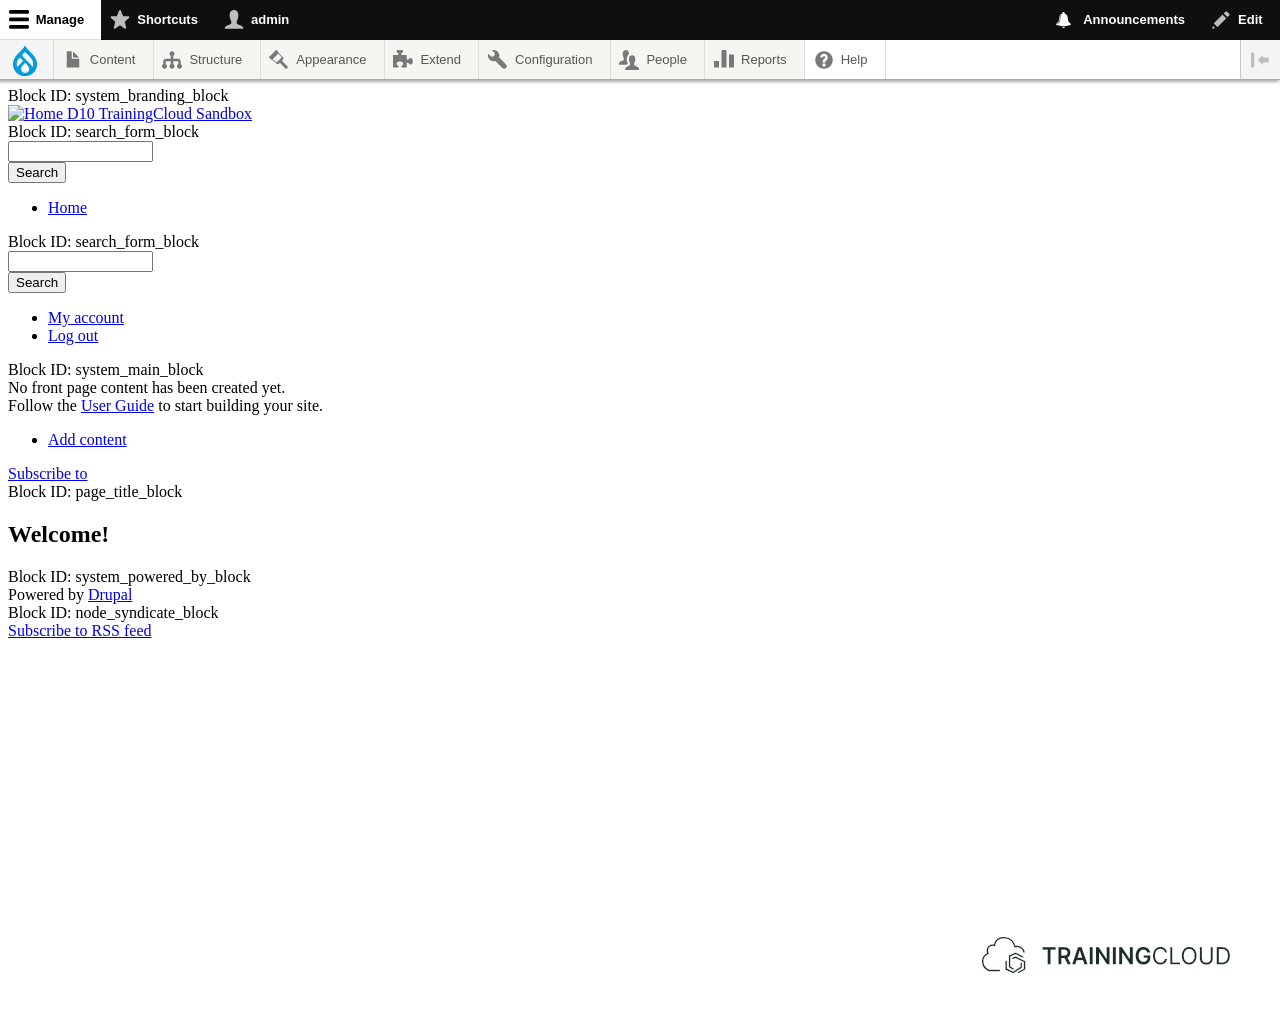
Congratulations. You've just created your first template override.
Activity 2
During this activity you'll make your overridden block template file a bit more useful by wrapping the output in a <div> with some built-in styling to clearly show where each block begins and ends.
Open up your theme's block.html.twig.
You previously added this code:
<div>
 Block ID: {{ plugin_id }}
</div>
Add some inline style:
<div style="color: red">
 Block ID: {{ plugin_id }}
</div>
Now wrap all the markup in a div with a border:
<div style="border: solid red 1px; padding: 1em; margin: 1em">
  ...
</div>
The full code listing for your block.html.twig (without the comments) becomes:
<div style="border: solid red 1px; padding: 1em; margin: 1em">
 <div style="color: red">
  Block ID: {{ plugin_id }}
 </div>
 <div{{ attributes }}>
   {{ title_prefix }}
   {% if label %}
     <h2{{ title_attributes }}>{{ label }}</h2>
   {% endif %}
   {{ title_suffix }}
   {% block content %}
     {{ content }}
   {% endblock %}
 </div>
</div>Note: have not changed any template logic here - we wrapped the output in a div with a red border, nothing more.
Clear your caches and reload the homepage. It should look similar to this:
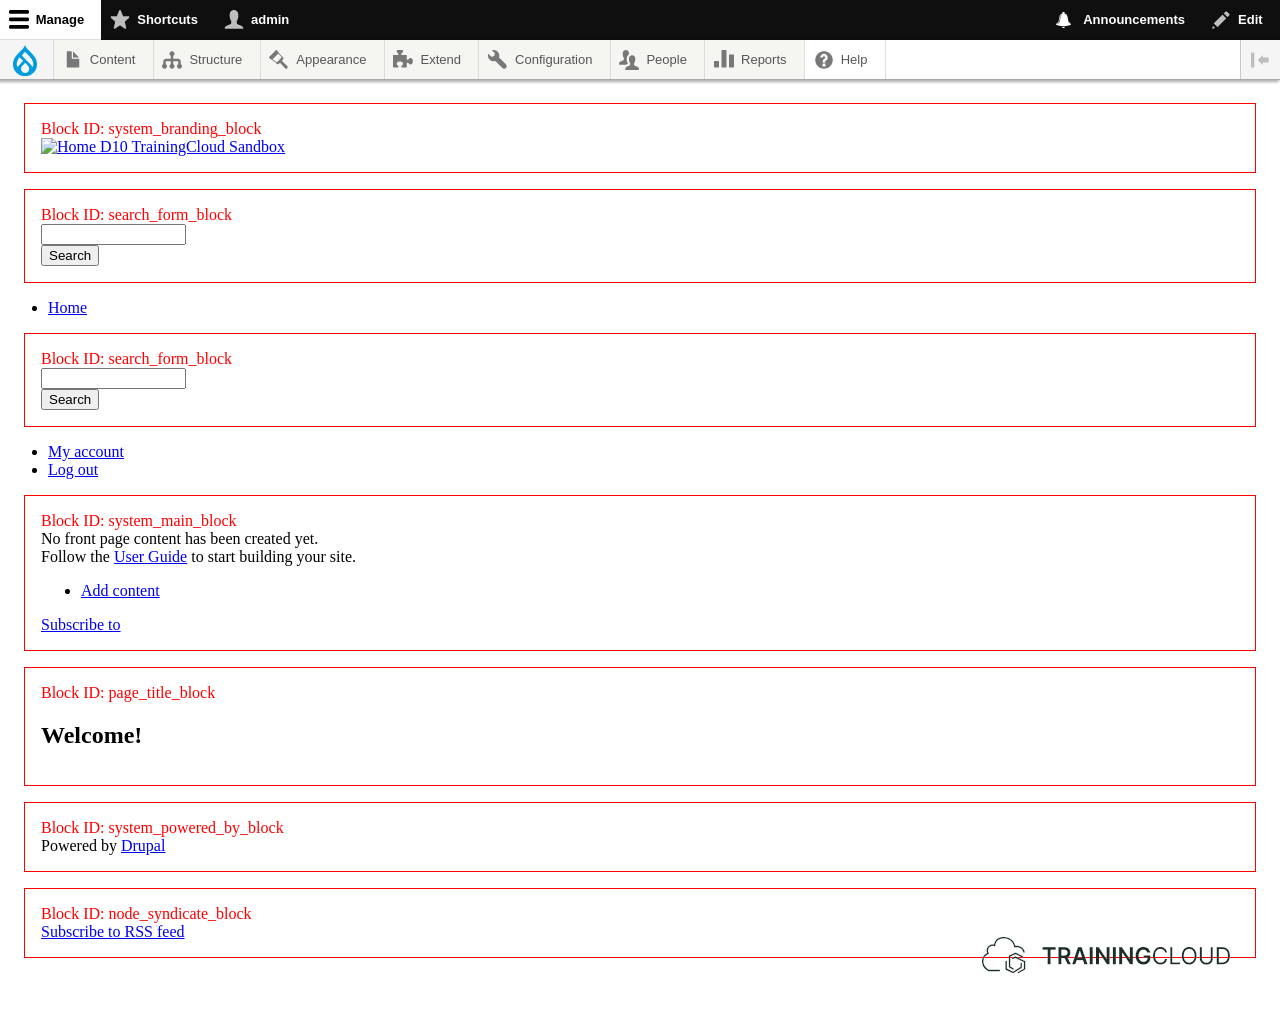
You've now overridden the block template file with some additional HTML/CSS to show you the boundaries of each block.
However, it looks like some of the blocks are still missing a red border. More specifically, the two menu blocks don't seem affected by your template changes.
In the next activities you'll find out why.
Activity 3
If you look at the page's source code you will find that these blocks are indeed blocks because they're wrapped in a <div> with class="block", so why are they ignoring your block template?
Can you guess why some of these blocks are ignoring your block template?
Activity 4
In your IDE, browse to core/themes/stable9/templates/block. This directory contains the block-related template files the Stable9 theme provides:
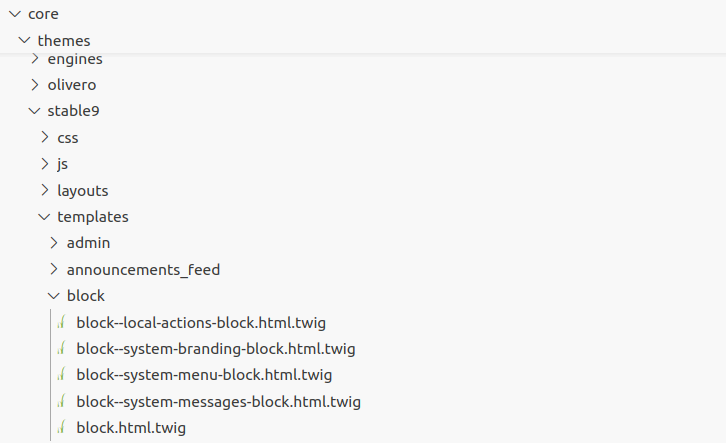
You have determined that the 2 menu blocks are ignoring your overridden block template file. Looking at the block-related template files provided by Stable9, is there another block template file that might be related to menu blocks?
Activity 4B
To override Stable9's block--system-menu-block.html.twig, copy it into your theme directory and modify it.
Similar to Activity 2, find the <nav>...</nav> tags and wrap them into a div that has a blue border:
<div style="border: solid blue 1px; padding: 1em; margin: 1em">
 <nav>
   [...]
 </nav>
</div>
Save the file, clear your caches, and reload your page.
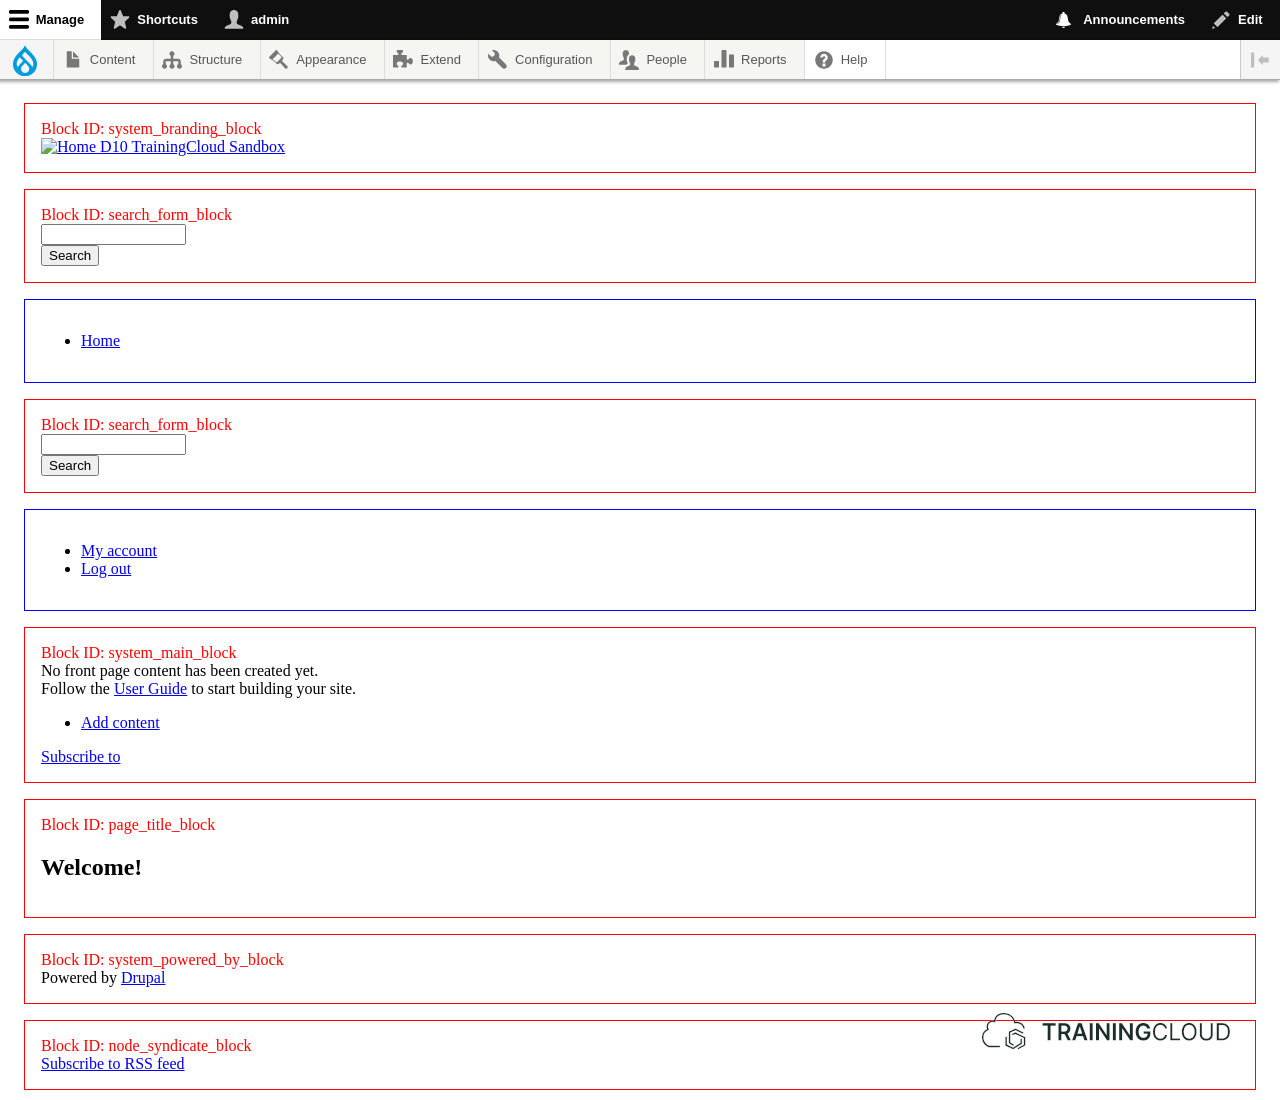
In addition to the blocks with a red border, your two menu blocks should now have a blue border:
Activity 4C
The red blocks are showing the Block ID, but the blue ones are not.
- Why is this happening?
- How can you fix this?
Template specificity
As you know by now, Drupal uses a naming convention that helps Drupal decide which template files to select and which ones to ignore.
For every page part it needs to render, Drupal will go through a number of possible template file names - from very specific to very generic, and uses the first one it finds.
Later in this course we will discuss the specificity and naming conventions for template files in detail.
Summary
- Pages consist of many different components.
- The markup of many of these components is defined in template files.
- Template files are provided by the core/contrib module that provide the components, and can be overridden by one or more themes.
- You can override a template file by copying it into your own theme and modifying your copy.
- Drupal will first look for template files in the currently active theme's directory; if it doesn't find any, it will look elsewhere.
- Drupal uses a naming convention to let you indicate the specificity of template files.